はじめに
Pixi.jsについて学んだことの備忘録。
シーン切り替え(スライド)について。
ここではPixi.jsのver4を使用しています。
最新版では書き方が全然違うため動かないため注意が必要です。
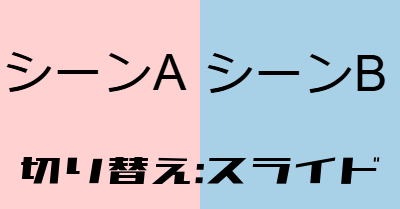
シーン切り替え:スライド
場面Aから場面Bにシーンを切り替えたい。
スライド式で入れ替わったら楽しそう。
(2作目のゲーム中に使いました)
画面をタッチすると、シーンAとシーンBが切り替わります。
どっちの画面も見えつつ切り替わるのも味があって良いよね。
(実装の都合上、連打すると表示がおかしくなるので注意)
コードは下記のとおり。
<!DOCTYPE html>
<html lang="ja">

<head>
    <meta charset="UTF-8">
    <meta name="viewport" content="width=device-width, initial-scale=1.0">
    <title>シーン切替(スライド) Pixi.js</title>
    <script src="../../pixi.min.js"></script>
</head>

<body style="margin: 0; overflow: hidden;">
    <script>
        // Pixi.jsのアプリケーションを作成
        const app = new PIXI.Application({
            width: 360,                 // 画面の横幅
            height: 548,                // 画面の縦幅
            backgroundColor: 0xcccccc,  // 背景色を設定
        })

        // appをbodyに追加
        document.body.appendChild(app.view);

        // シーンA(薄い桃色の背景)
        const sceneA = new PIXI.Container();
        const backgroundA = new PIXI.Graphics();
        backgroundA.beginFill(0xFFD1D1); // 薄い桃色
        backgroundA.drawRect(0, 0, app.screen.width, app.screen.height);
        backgroundA.endFill();
        sceneA.addChild(backgroundA);

        const textA = new PIXI.Text('シーンA', { fontSize: 50, fill: 0x000000 });
        textA.anchor.set(0.5);
        textA.x = app.screen.width / 2;
        textA.y = app.screen.height / 2;
        sceneA.addChild(textA);

        // シーンB(薄い水色の背景)
        const sceneB = new PIXI.Container();
        const backgroundB = new PIXI.Graphics();
        backgroundB.beginFill(0xA8D0E6); // 薄い水色
        backgroundB.drawRect(0, 0, app.screen.width, app.screen.height);
        backgroundB.endFill();
        sceneB.addChild(backgroundB);

        const textB = new PIXI.Text('シーンB', { fontSize: 50, fill: 0x000000 });
        textB.anchor.set(0.5);
        textB.x = app.screen.width / 2;
        textB.y = app.screen.height / 2;
        sceneB.addChild(textB);

        // 初期シーンとしてシーンAを表示
        app.stage.addChild(sceneA);

        // シーン切替のための状態
        let currentScene = 'A';

        // シーン切替関数
        function switchScene() {
            if (currentScene === 'A') {
                // シーンA -> シーンB
                app.stage.addChild(sceneB);

                // スライドアニメーション(シーンAを右にスライドしながら)
                sceneA.x = 0;
                sceneB.x = app.screen.width;
                app.ticker.add(animateSlideB);
                // スライドアウトのアニメーション後に次のシーンを表示
                setTimeout(() => {
                    app.stage.removeChild(sceneA);
                }, 750)
            } else {
                // シーンB -> シーンA
                app.stage.addChild(sceneA);

                // スライドアニメーション(シーンBを左にスライドしながら)
                sceneB.x = 0;
                sceneA.x = -app.screen.width;
                app.ticker.add(animateSlideA);
                setTimeout(() => {
                    app.stage.removeChild(sceneB);
                }, 750)
            }

            // 現在のシーンを切り替え
            currentScene = currentScene === 'A' ? 'B' : 'A';
        }

        // シーンBへスライドするアニメーション
        function animateSlideB(delta) {
            sceneA.x -= delta * 10;
            sceneB.x -= delta * 10;

            // アニメーションが終わったら
            if (sceneB.x <= 0) {
                sceneB.x = 0;
                app.ticker.remove(animateSlideB);
            }
        }

        // シーンAへスライドするアニメーション
        function animateSlideA(delta) {
            sceneA.x += delta * 10;
            sceneB.x += delta * 10;

            // アニメーションが終わったら
            if (sceneA.x >= 0) {
                sceneA.x = 0;
                app.ticker.remove(animateSlideA);
            }
        }


        // タッチまたはクリックでシーン切替
        app.view.addEventListener('pointerdown', switchScene);

    </script>
</body>

</html>
◆メインの処理を抜粋
        // シーン切替関数
        function switchScene() {
            if (currentScene === 'A') {
                // シーンA -> シーンB
                app.stage.addChild(sceneB);

                // スライドアニメーション(シーンAを右にスライドしながら)
                sceneA.x = 0;
                sceneB.x = app.screen.width;
                app.ticker.add(animateSlideB);
                // スライドアウトのアニメーション後に次のシーンを表示
                setTimeout(() => {
                    app.stage.removeChild(sceneA);
                }, 750)
            }
1.シーンAの状態で、シーンBをx座標が画面端になるよう追加
app.stage.addChild(sceneB);
sceneB.x = app.screen.width;
2.シーンBにスライドする処理を呼ぶ
app.ticker.add(animateSlideB);
3.スライドが終わるくらいの時間後にシーンAを削除
setTimeout(() => {
app.stage.removeChild(sceneA);
}, 750)
◆シーンBにスライドする処理を抜粋
        // シーンBへスライドするアニメーション
        function animateSlideB(delta) {
            sceneA.x -= delta * 10;
            sceneB.x -= delta * 10;

            // アニメーションが終わったら
            if (sceneB.x <= 0) {
                sceneB.x = 0;
                app.ticker.remove(animateSlideB);
            }
        }
1.シーンA、シーンBともに一定速度で左に移動
sceneA.x -= delta * 10;
sceneB.x -= delta * 10;
※deltaは「前回のフレームから現在のフレームにかかる時間(秒単位)」
(1フレームごとにだいたい1、1秒で60くらいの値)
2.シーンBが左端に到達したら移動処理を削除
if (sceneB.x <= 0) {
sceneB.x = 0;
app.ticker.remove(animateSlideB);
}
※deltaは一定の値でないため、sceneBのx座標は0ピッタリにならない
そのため、0より小さくなったら強制的に0に補正している
こんな感じです。移動するのも見てるだけでも楽しいね
おわりに
パッとシーンが切り替わると、何が起こったのか分からず混乱しちゃうかも。
こうやって、移動しているところも含めて見えると分かりやすくなりそう。
簡単な実装だとどうしても淡泊で動きの少ないものになってしまうので、
なるべく動きをつけて、遊びの一つに取り入れられたら良いな。
完成しないと遊んでもらえないので、できる範囲で取り入れていきたい。
おわり
コメント