はじめに
Pixi.jsについて学んだことの備忘録。
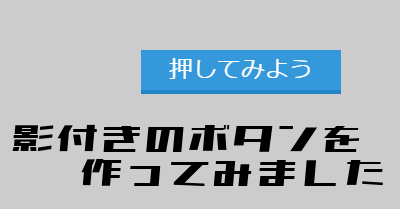
影付きのボタンについて。
ここではPixi.jsのver4を使用しています。
最新版では書き方が全然違うため動かないため注意が必要です。
影付きのボタン
ゲームスタートで押すボタン。
何気なく使っているけれど、色々と考えられているみたい。
今回は、ボタンっぽいボタンを作ってみます。
まずはじめに。
1作目のゲームのボタンは、赤色の四角形です。
ここをタッチすれば、ゲームが始まります。
ボタンとして機能しているけれど、なんだか味気ないような…。
続きまして。
2作目のゲームのボタンは、色の違う四角形2つです。
水色の四角形の下に、影のような濃い水色の四角形があります。
タッチすると水色の四角形が下にズレて、濃い水色の四角形が消える。
なんだか押している感じがする!
この四角形の移動を一瞬だけ見せてから、ゲームが始まります。
小さなことだけど、1作目よりはボタンを押してる感が出ている。と思っている。
ということで、今回はこの影付きボタンについて。
ボタンを押すとボタンの上のテキストが変わるよ。
今回は影付きボタンの部分はクラス化しています。
コードは下記のとおり。
<!DOCTYPE html>
<html lang="ja">

<head>
    <meta charset="UTF-8">
    <meta name="viewport" content="width=device-width, initial-scale=1.0">
    <title>影付きのボタン Pixi.js</title>
    <script src="../../pixi.min.js"></script>
</head>

<body style="margin: 0; overflow: hidden;">
    <script>
        // Pixi.jsのアプリケーションを作成
        const app = new PIXI.Application({
            width: 360,                 // 画面の横幅
            height: 548,                // 画面の縦幅
            backgroundColor: 0xcccccc,  // 背景色を設定
        })

        // appをbodyに追加
        document.body.appendChild(app.view);

        //影付きボタンのクラス
        class ButtonWithText extends PIXI.Container {
            constructor(x, y, width, height, color, text, fontSize = 24, textColor = 0xFFFFFF) {
                super();

                // ボタンの影
                this.shadow = new PIXI.Graphics();
                this.shadow.beginFill(this._darkenColor(color));  // 色を暗くした色を影として使用
                this.shadow.drawRect(0, 0, width, height);
                this.shadow.endFill();
                this.shadow.position.set(0, 4);  // 影をボタンの下にずらす

                // ボタンの背景となる四角形
                this.button = new PIXI.Graphics();
                this.button.beginFill(color);
                this.button.drawRect(0, 0, width, height);
                this.button.endFill();

                // ボタンの位置を設定
                this.position.set(x, y);

                // テキストを作成
                this.text = new PIXI.Text(text, {
                    fontFamily: 'Arial',
                    fontSize: fontSize,
                    fill: textColor,  // テキストの色を引数で指定
                    align: 'center'
                });

                // テキストをボタンの中央に配置
                this.text.anchor.set(0.5, 0.5);
                this.text.position.set(width / 2, height / 2);

                // ボタンとテキストをコンテナに追加
                this.addChild(this.shadow);  // 影を最初に追加
                this.addChild(this.button);  // ボタンをその上に追加
                this.addChild(this.text);    // テキストを一番上に追加

                // ボタンがクリックされたときの動き(初期状態では設定しない)
                this.onClick = null;

                // ボタンが押されたときの動き
                this._isPressed = false;

                // ボタンが押されたときのイベントリスナー
                this.button.interactive = true;
                this.button.buttonMode = true;
                this.button.on('pointerdown', () => {
                    if (!this._isPressed) {
                        this._isPressed = true;
                        this._pressButton();
                        if (this.onClick) {
                            // ボタンを押したアニメーションを見せるため、_pressButtonの0.3秒後にonClickを実行
                            setTimeout(() => {
                                // 追加のクリック動作を実行
                                this.onClick();
                            }, 300);  // 300ミリ秒 (0.3秒)
                        }
                    }
                });

                // ボタンが離されたときの動き
                this.button.on('pointerup', () => {
                    if (this._isPressed) {
                        this._isPressed = false;
                        this._releaseButton();
                    }
                });

                // ボタンが外れても元に戻る
                this.button.on('pointerout', () => {
                    if (this._isPressed) {
                        this._isPressed = false;
                        this._releaseButton();
                    }
                });
            }

            // ボタンを押したときのアニメーション(3px下がる動き)
            _pressButton() {
                // ボタンの位置を3px下げる
                this.button.position.y += 3;    // ボタン
                //this.shadow.position.y += 3;    // 影も合わせて動かす
                this.text.position.y += 3;       // テキスト
            }

            // ボタンが離されたときのアニメーション(元の位置に戻る)
            _releaseButton() {
                // ボタンの位置を元に戻す
                this.button.position.y -= 3;    // ボタン
                //this.shadow.position.y -= 3;  // 影も合わせて戻す
                this.text.position.y -= 3;       // テキスト
            }

            // 色を暗くするためのヘルパー関数
            _darkenColor(color) {
                let hex = color; // 色は0x形式の整数で取得

                let r = Math.max(((hex >> 16) & 0xFF) - 20, 0);
                let g = Math.max(((hex >> 8) & 0xFF) - 20, 0);
                let b = Math.max((hex & 0xFF) - 20, 0);

                return (r << 16) | (g << 8) | b;  // 0xRRGGBBの形式に戻す
            }

            // ボタンが押されたときのアクションを外部から設定
            setOnClick(callback) {
                this.onClick = callback;
            }
        }

        // ボタンを作成
        let myButton = new ButtonWithText(app.view.width/2- 100, app.view.height/2-20, 200, 40, 0x3498db, '押してみよう', 24);

        // ボタンがクリックされたときのアクションを設定
        myButton.setOnClick(() => {
            // この中にボタンを押したときの動きを記述
            myButton.text.text = "押せたよ!";
        });

        // ボタンをステージに追加
        app.stage.addChild(myButton);

    </script>
</body>

</html>
クラス化した影付きボタンについて。
引数に下記を与えるとボタンを作ってくれます。
・x:x座標
・y:y座標
・width:ボタンの横幅
・height:ボタンの縦幅
・color:ボタンの色(メインの色、影の色は自動で設定)
・text:ボタンの上に表示する文字列
・fontSize:テキストのフォントサイズ(省略可、その場合は24)
このクラスは下記のように呼べます。
let myButton = new ButtonWithText(app.view.width/2- 100, app.view.height/2-20, 200, 40, 0x3498db, '押してみよう', 24);注意点として、ボタンの色は明るい色を指定しましょう。
影の色はメインの色をもとに暗くなる色を自動設定しているため、メインの色が暗いと影の色と違いが分かりにくいかも。
また、ボタンを押したときの動きは下記のように設定できます。
今回は、ボタンのテキストを変更しています。
// ボタンがクリックされたときのアクションを設定
myButton.setOnClick(() => {
    // この中にボタンを押したときの動きを記述
    myButton.text.text = "押せたよ!";
});
こんな感じで、作ったクラスを呼ぶだけで影付きボタンが作れるようになりました。便利!
おわりに
ボタンだけでも奥が深い。
きっともっと良い感じの表現があるんだろうな。
思いついたら改善してみよう。
おわり
コメント